A good bun is not really about technique, it is about knowing your hair.
Mine is thick and slippery and hates staying up, so I gravitate toward styles that use tension against itself, like the rope twist or the knotted bun. Fine-haired clients almost always get the bubble bun from me because it photographs like they have three times the volume they actually have.
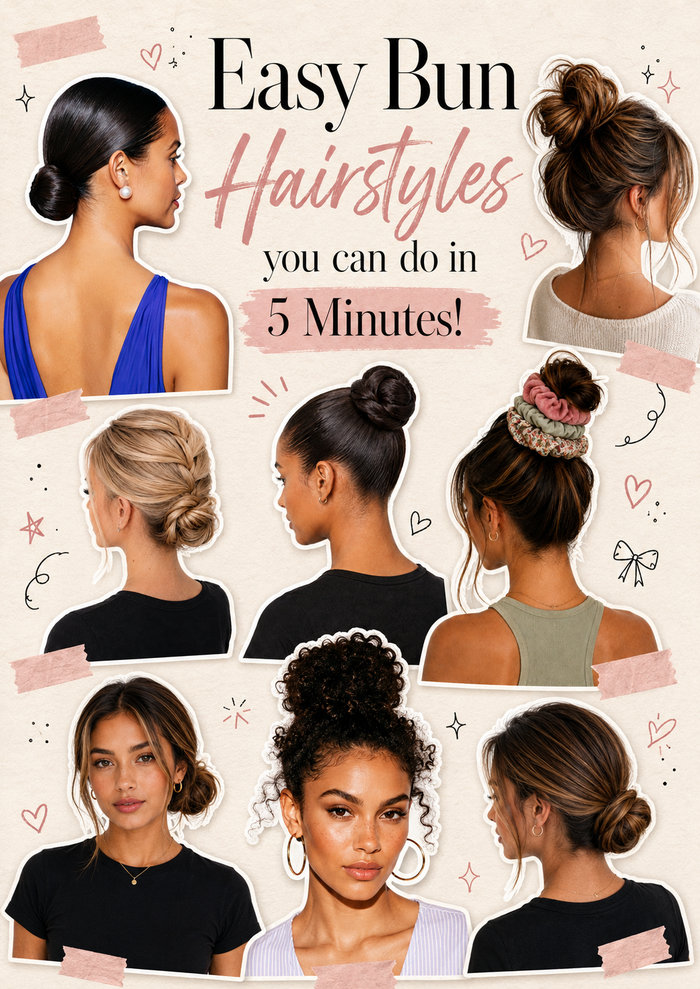
Point is – there is a bun out there for everyone, and most of the ones below can be easily done in5 minutes (with some practice first)!
Tips for a 5-Minute Easy Bun That Looks Cute
I tell every client the same few things before they try any of these at home. The difference between a bun that looks good and one that looks like you gave up is usually just one or two small things.
- Dirty hair grips better than clean hair, day two or three is honestly the sweet spot for most buns
- Flip your head upside down before gathering, it adds instant volume at the roots
- Use a scrunchie not a tight elastic, it holds just as well and does not leave a dent
- Pull the bun apart slightly with your fingers after securing it, a bun that is too neat looks stiff
- Leave two small pieces out at the front if you’re going for a casual look, it frames the face and makes everything look more intentional
- One pin is not always enough, three or four bobby pins placed in different directions is what actually holds
Top 3 Easy Bun
Hairstyles
Quick, cute, and totally doable in under 5 minutes
cute · quick · no-fail buns
Effortless Messy Bun
Your go-to for cute-without-trying. The trick? Stop overthinking it — the less you fuss, the better it looks.
✦ Quick Tips
♡ Perfect For
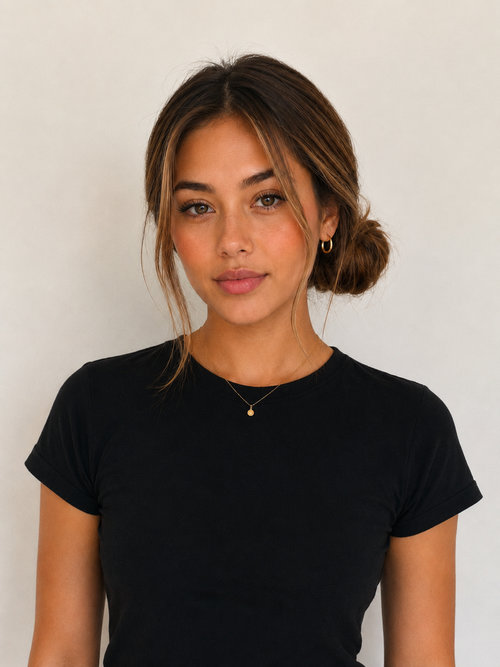
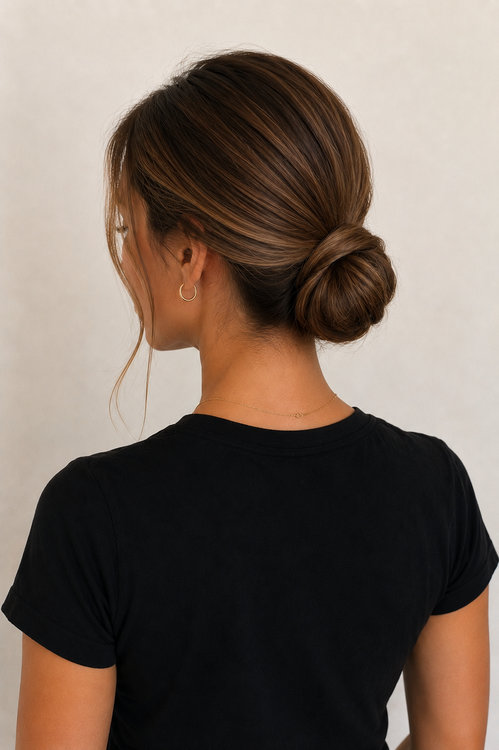
Sleek Low Bun
Clean, polished, holds all day. Your smartest five-minute look — there’s a stylist secret in every single step.
✦ Quick Tips
♡ Perfect For
The Top Knot
Height is everything with this one. Go high — if it sits any lower than the crown, it loses all its cool factor.
✦ Quick Tips
♡ Perfect For
The Effortless Messy Bun That Actually Looks Intentional
I love this one so much. It is my go-to bun when I want to look cute but do not have time. You just grab your hair up high and twist it kind of loose, not too tight.
Wrap it around itself and pop in a scrunchie. I always pull a few bits out at the front because that is what makes it look good. The secret is you have to not care too much while you do it.
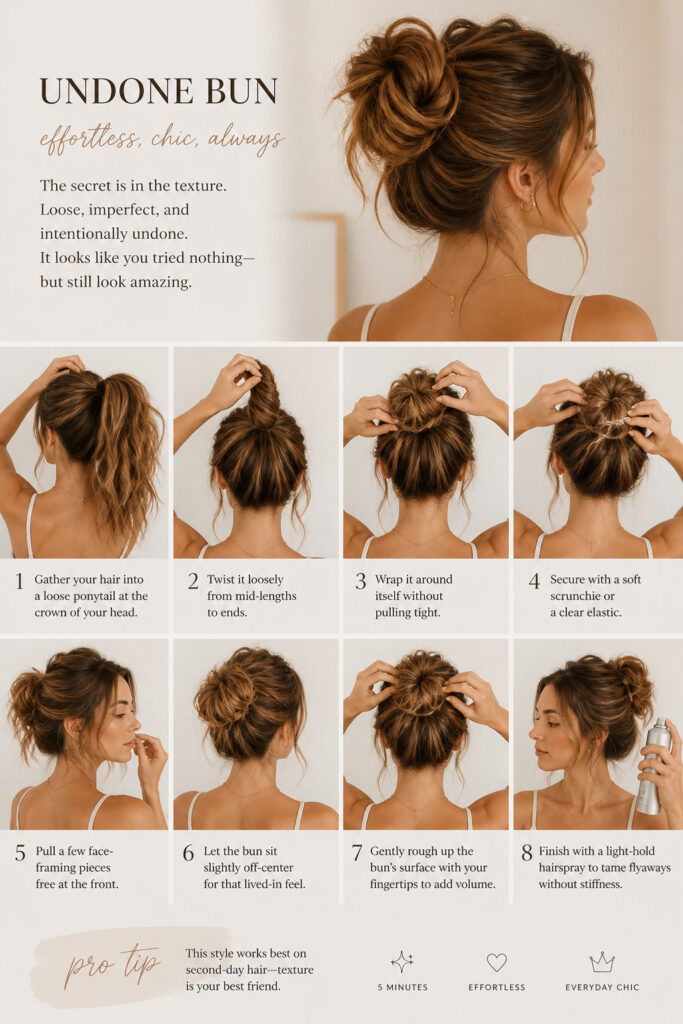
Second day hair is honestly the best for this. I tell my friends and clients all the time, do not wash your hair before you try this bun. A tiny bit of light spray keeps it from falling apart but do not go crazy with it. Tug the bun apart a little with your fingers once it is up. It should look a little messy on purpose.
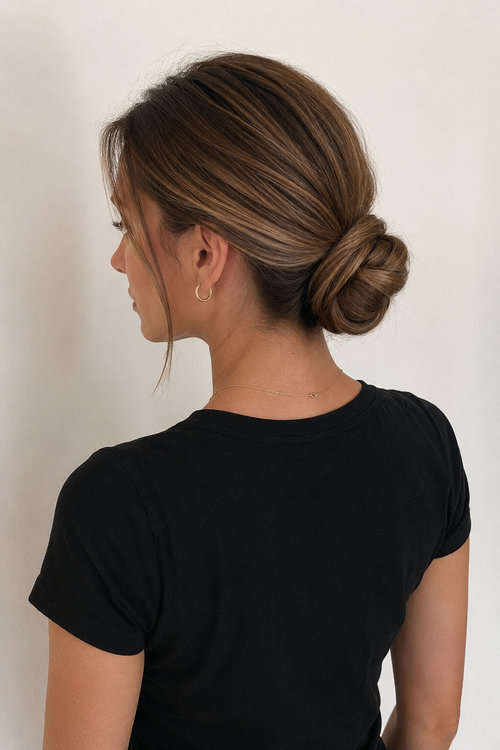
The Sleek Low Bun That Turns Heads Without Trying
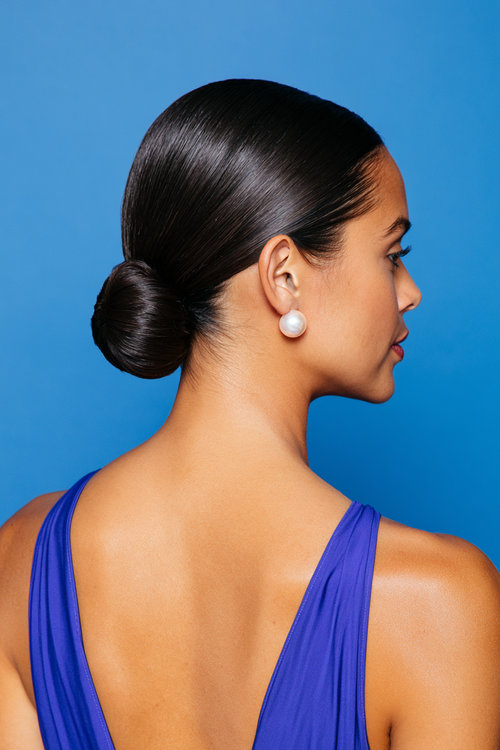
This bun is clean and I really like that about it. Put a little smoothing cream on first, that step matters more than people think. Comb everything back really smooth from a side part or the middle, either works fine.
Gather it all at the back of your neck, low down. Then twist the hair into a coil shape and pin it flat with pins that match your hair color.
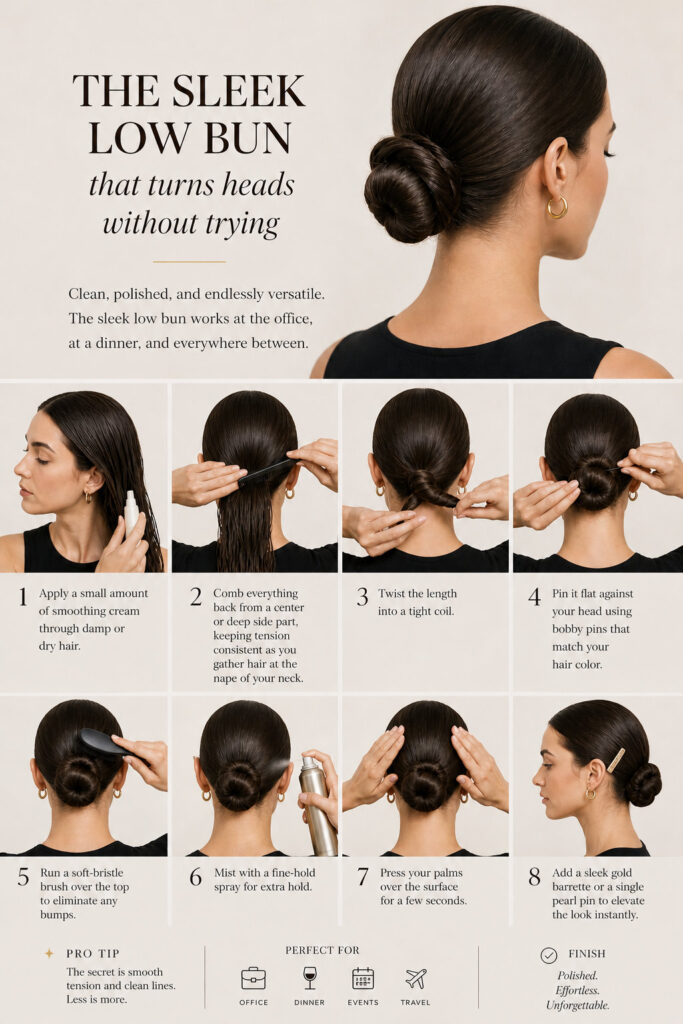
I run a brush over the top one more time after pinning just to catch any bumps. Press your palms flat on the sides for a few seconds after you spray it. That trick sets it faster. A small gold pin or pearl clip on the side makes this look really fancy. I have done this bun on brides and it holds all day no problem.
The Claw Clip Bun That’s Having a Major Moment Right Now
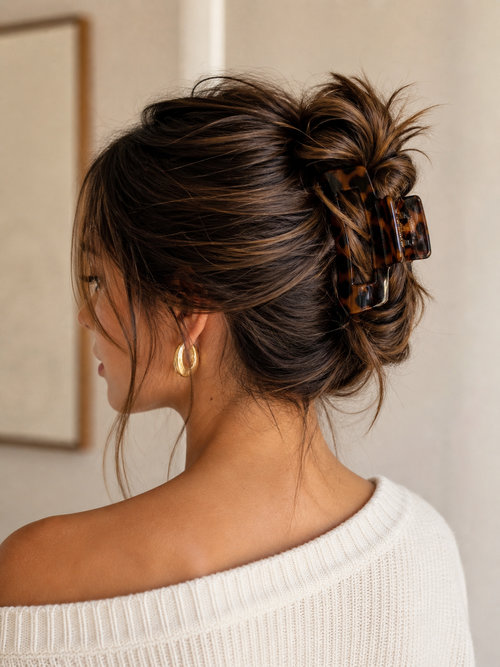
Okay so I am obsessed with claw clips right now and have been for a while. You flip your head down, grab the hair loosely, give it a few twists, then clip it. That is genuinely all there is to it. I like a big clip for this, the bigger the better in my opinion. Tortoiseshell ones look amazing on almost every hair color I have worked with.
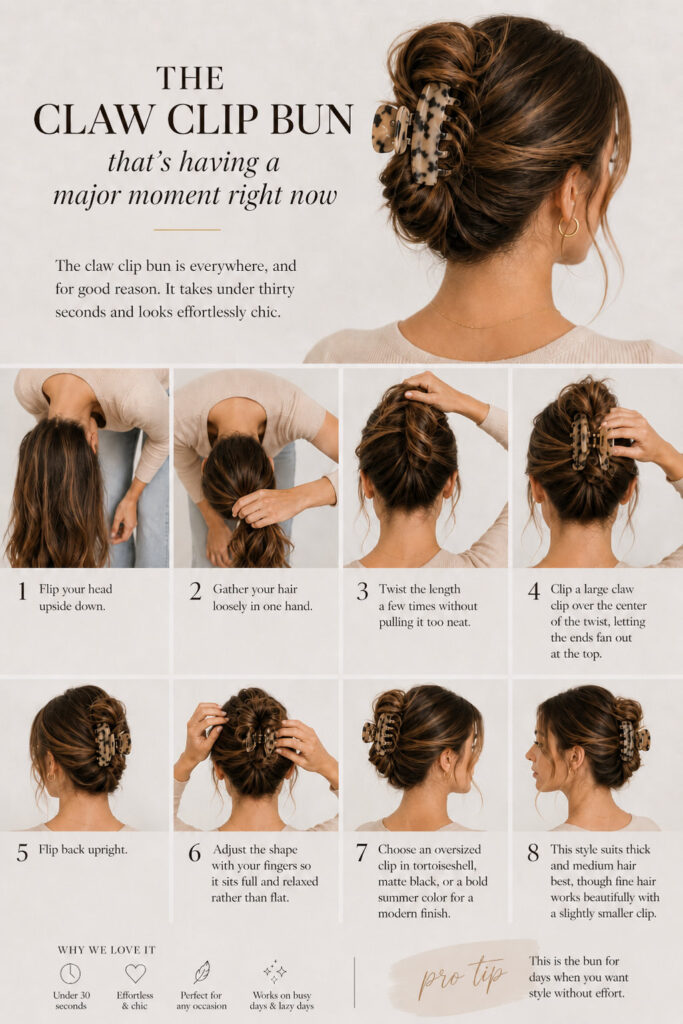
The trick is to not make it too flat against your head. Let the ends stick out at the top, that is the whole look. Thick hair loves this bun more than anything. Fine hair works too but go for a slightly smaller clip so it grips better. I have done this on myself in literally twenty seconds and had people ask me if I got a blowout.
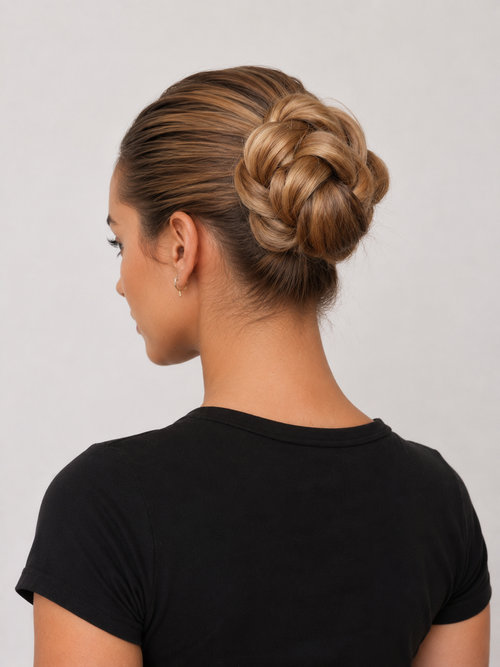
The Braided Bun That Looks Far More Complicated Than It Is
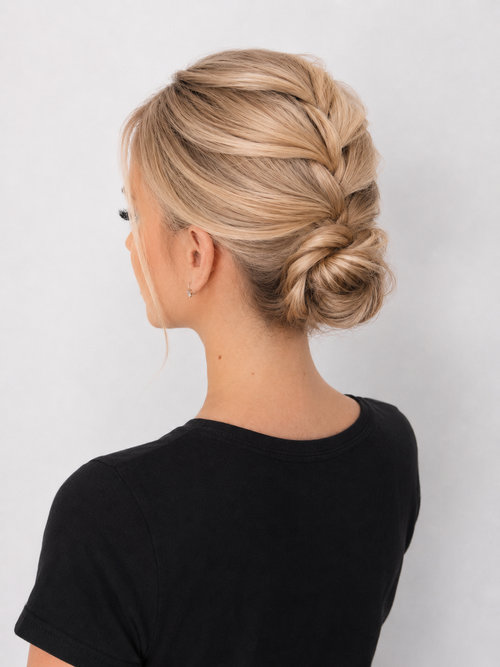
People see this one and always think I spent forever on it. I did not. Just braid your hair in a regular three strand braid first. Go all the way to the ends and secure it. Then you coil that braid around itself at the nape of your neck and pin it in place. The braid gives the bun this really nice texture that a plain bun just does not have.
I loosen the braid slightly with my fingers before I coil it up. That makes it look softer and bigger. Mid-length and long hair shows off this bun the best in my experience. Tuck a few extra pins underneath so it stays put all day. A little shine spray at the end and it honestly looks like something from a salon, which I guess it is when I do it.
The Half-Up Bun for When You Can’t Choose Between Up and Down
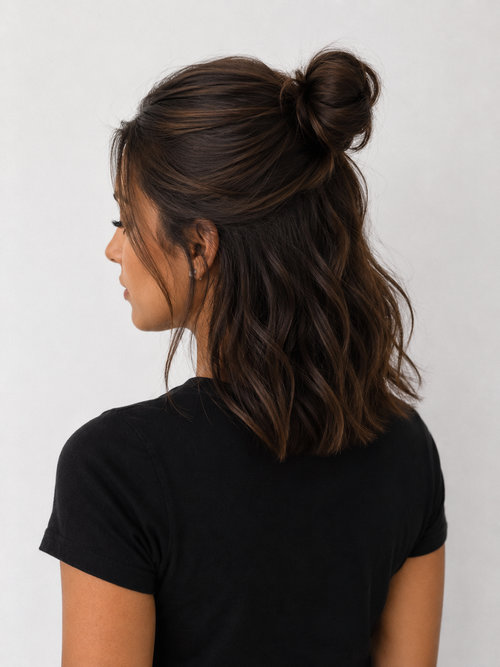
I do this one on myself more than any other style honestly. Take the top section from ear to ear and pull just that part up. Twist it or loop it and clip or tie it right on top of your head. Leave everything else down. It sounds simple because it is simple.
The bottom half being loose and the top being up is such a good balance. I spray a little texture spray on the loose bottom hair so it does not look flat. Pulling two little strands out at the front makes it look softer. This works on every face shape I have seen in my chair, really every single one. It is one of those styles that just works and I cannot explain exactly why.
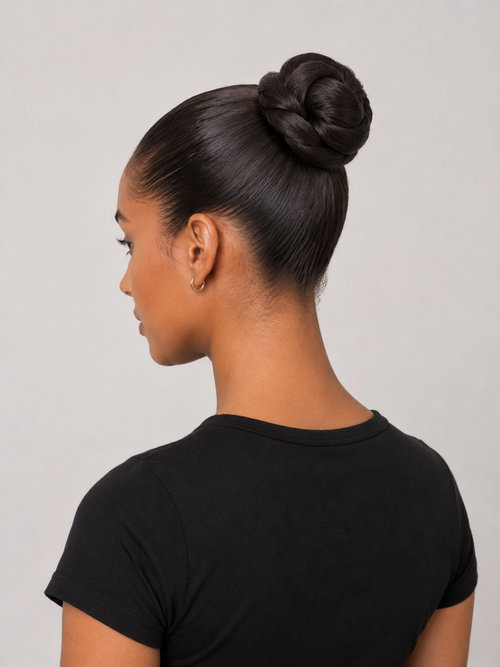
The Top Knot That Feels Cool Without Feeling Casual
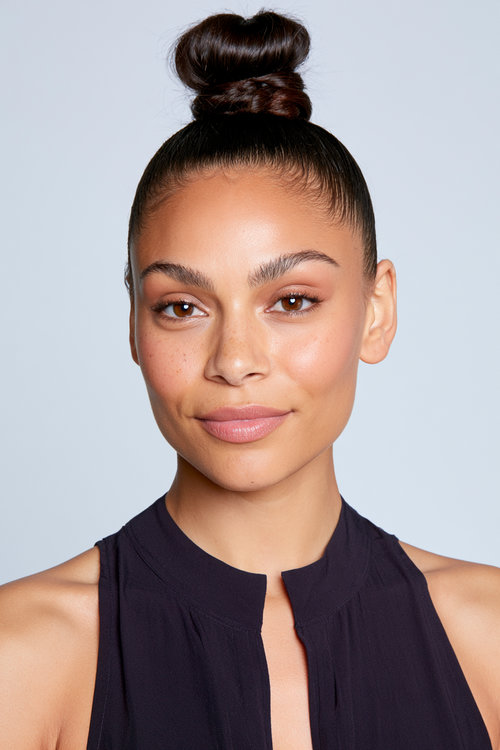
Height is everything with this one, I mean that seriously. Pull all your hair straight up as high as it will go. Twist it and wrap it once around the base elastic so it forms a knot, not a full bun loop. Tuck the ends under and pin them flat. If it sits any lower than the crown of the head it just reads as a regular bun and the whole vibe changes.
For sleek I smooth with a brush before pulling up. For textured I scrunch in sea salt spray first and it looks completely different, in a good way. I love that this works after the gym and also for a night out. I have not had a client complain about a top knot once. It also keeps hair off the neck which in summer is honestly everything.
The Twisted Rope Bun for Thick Hair That Refuses to Cooperate
I have worked on a lot of thick hair over the years and this is my answer for it. Split the hair into two sections. Twist each one in the same direction on its own first. Then twist both of those together but going the other way. That opposition is what creates the strength, the two forces kind of lock against each other.
Coil the finished rope into a bun wherever you want it and use a strong elastic plus several pins. I always tell thick-haired clients to put a little balm on before they start so the twist has something to hold onto. This bun does not fall out, not like other buns do. Four minutes from start to finish and it looks really intricate. I have had people ask me if it was professionally done and I say yes, which is technically true when I do it.
The Ballet Bun That Works Outside the Dance Studio
I grew up doing ballet and this bun is in my muscle memory. Start with brushed hair and pull it into a high tight ponytail first. Edge control or gel along the hairline is not optional, it is the whole point of this style. Then twist the ponytail tight and coil it around the base, pinning firmly as you go. Wrap one small section of hair around the elastic to hide it completely.
A fine tooth comb is your best friend for this one. Run it over everything before you spray. Set it with a flexible hold spray and press with your palms. The neck looks longer in this style and I always notice it on clients when they see themselves in the mirror, they sit up a little straighter. Big earrings look incredible with this bun, that is my personal styling advice and I stand by it.
The Double Bun That Brings Playful Energy to Any Look

I genuinely love doing these on people because their whole face changes when they see it. Part the hair straight down the middle all the way to the neck. Secure each side into a high pigtail. Then twist or loop each pigtail into its own small bun and pin each one well. The symmetry is really satisfying to do and even more satisfying to look at.
Keep them tight for a sharper look or leave them loose for something more playful. I add little butterfly clips or ribbon ties sometimes when clients want something extra cute. Curly hair makes the most beautiful double buns I have ever seen, they puff up and look really full without any extra work. This style honestly suits everyone and I have never had someone look bad in double buns in all my years doing hair.
The Knotted Bun That Holds Without a Single Bobby Pin
I discovered this one when I ran out of pins mid-appointment and had to improvise. Make a ponytail low or at a medium height. Split the ponytail into two parts. Tie those two parts into a loose overhand knot exactly like the start of tying a shoe. Then fold the ends upward and tuck them into the back of the knot. That is it.
The friction of the knot holds itself and I still find that a little bit magic every time. Dry hair with some texture grips better than freshly washed hair for this one. A quick spray of texturizing mist helps on silky hair. The knot looks clean and intentional, not like you were improvising in a panic because you ran out of pins, speaking from experience.
The Side Bun That Changes Your Entire Silhouette
Moving the bun from the back to the side is one of those small changes that makes a big difference. Gather all the hair toward one side, just above and behind the ear. Twist or loop it into a bun there and pin it. The asymmetry does something really nice to the shape of the face and neck. I usually pull one loose strand forward along the opposite cheek to balance it out.
The height of the side bun changes the whole look too. Higher up near the ear is more modern and playful. Lower near the jaw is more dramatic and grown up. I let clients choose after I show them both in the mirror. It takes about the same amount of time as a regular bun but looks like you thought about it a lot more, which is the goal.
The Textured Bun That Makes Naturally Curly Hair Shine
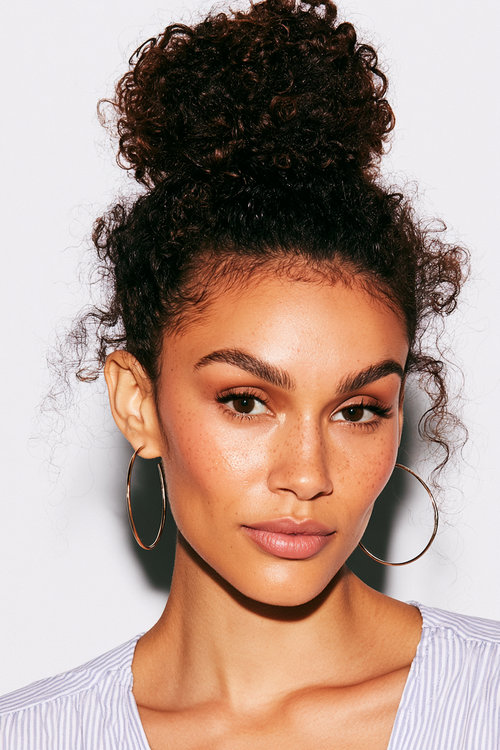
I have a lot of curly-haired clients and I always say the same thing, work with the curl not against it. Put curl cream or light mousse on damp hair first. Let the curls form naturally before you even think about putting it up. Then gather everything upward loosely into a high bun without squashing the curl structure. Use a soft fabric scrunchie only, never a tight elastic that will leave a dent.
Let coils and ringlets spring free around the edges, that is not a mistake, that is the feature. The pineapple method of gathering up from the tips first works really well to preserve the shape. I refresh these buns with a curl mist mid-day if a client needs it. Curly buns have a fullness and life that I genuinely love, they are some of my favorite buns to do.
The French Twist Bun for Occasions That Call for Something Refined
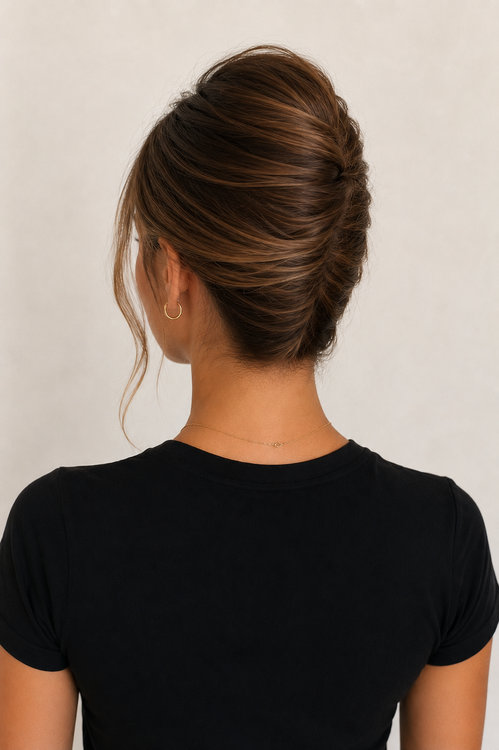
This is the bun I reach for when someone needs to look really put together. Brush all the hair to one side at the back and hold it flat. Then fold the whole section upward in a vertical roll and press it against the head. Pin it from bottom to top as you go, hiding the pins inside the fold. Fan the top edges out softly when you get to the end.
It takes a little practice but once your hands know the motion it goes fast. I can do a French twist in under three minutes now after so many years. One or two decorative pins at the top finish it nicely. The column of hair running up the back of the head looks so clean and intentional. Clients feel a certain kind of elegant when they wear this one and I like that feeling for them.
This one may be easier to understand by watching a tutorial, so here’s a great short video showing all the steps:
The Wrapped Bun That Hides the Elastic Completely
This is one of those finishing tricks that makes everything look more polished. Make your bun first and get it pinned where you want it.
Then pull out one small strand from the underside, about half an inch wide. Wrap that strand tightly around the elastic base two or three times until you cannot see the elastic at all. Tuck the end of the strand underneath and pin it with one pin.
The difference this one small step makes is honestly a lot. I add this finish to almost every bun I do on clients because it elevates the whole thing. A tiny amount of pomade on the wrapping strand helps it stay flat and not slip. People assume it was done professionally when they see it and I always feel a little satisfied by that. Small detail, big result.
The Scrunchie Stack Bun for Maximum Color and Personality
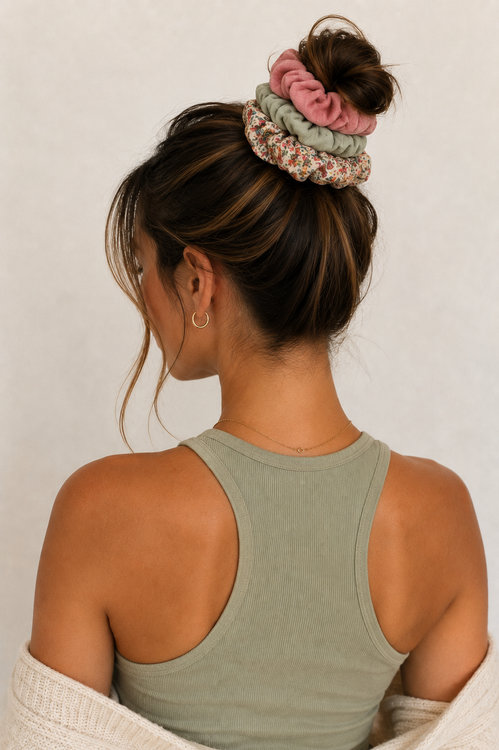
I started doing this a few years back and clients go wild for it. Make a high ponytail with your first scrunchie at the base. Loop the hair through a second scrunchie just below the first one. Tuck the ends up into the elastics to make a full rounded bun shape. Then add a third scrunchie around the actual body of the bun for more texture and color.
Mixing scrunchie materials is my favorite part of this style. Satin ones look shiny and fancy. Velvet looks rich and cozy. Cotton or crochet styles look artsy and fun. Clashing colors or matching colors both look great depending on what the client wants. This is the bun that celebrates the scrunchie instead of hiding it and I am fully here for that approach.